BB's TT
Forum rules
Each TTOC Member can post one thread to contain a full journal of their TT ownership.
This can be a full blown build thread or as simple as a set of pictures, the choice is yours.
Each TTOC Member can post one thread to contain a full journal of their TT ownership.
This can be a full blown build thread or as simple as a set of pictures, the choice is yours.
-
BrianB
- Posts: 577
- Joined: Wed Dec 16, 2015 7:21 pm
- TTOC Membership: 02935
- Location: Preston, Lancashire
A bit more of an update, the track control arms were fitted just before Christmas and all attaching bolts torqued along with the gear and gate selector cables and a couple of days ago I was able to torque all the driveshaft bolts, the drop links to anti roll bar nuts and re-installed the heat shield over the off side driveshaft.
- Attachments
-
- IMG_1713.jpeg (432.91 KiB) Viewed 3642 times
-
- IMG_1767.jpeg (373.74 KiB) Viewed 3642 times
-
- IMG_1769.jpeg (507.43 KiB) Viewed 3642 times
Mk1 TT225 Coupe 2002
-
BrianB
- Posts: 577
- Joined: Wed Dec 16, 2015 7:21 pm
- TTOC Membership: 02935
- Location: Preston, Lancashire
A little more progress made over the last few days, after several aborted attempts at pressing out the fwd bush on the dog bone mount I decided to use a 35mm hole cutter and drill out the rubber section and then using a hacksaw carefully cut two slots in the outer casing, using a small flat bladed screwdriver these came out very easily.
The powerflex bush was then fitted and the hole in the metal bracket opened up to 15mm to fit over the extension on the metal insert that goes into the new bush.
In addition the clutch has been bled using a Sealey pressure bleeder and the power steering fluid refilled. The power steering fluid was added by taking the tension off the auxiliary belt tensioner which allows the power steering pump pulley to be turned by hand pushing the fluid round the system and hopefully not introducing any air into the system.
Not the best picture but you can see the pin which goes through the tensioner to keep it in place taking the tension off of the aux belt allowing the pulley on the power steering pump to be turned by hand.
The powerflex bush was then fitted and the hole in the metal bracket opened up to 15mm to fit over the extension on the metal insert that goes into the new bush.
- IMG_1774.jpeg (537.08 KiB) Viewed 2462 times
- IMG_1783.jpeg (508.47 KiB) Viewed 2462 times
- IMG_1779.jpeg (300.53 KiB) Viewed 2462 times
Mk1 TT225 Coupe 2002
-
BrianB
- Posts: 577
- Joined: Wed Dec 16, 2015 7:21 pm
- TTOC Membership: 02935
- Location: Preston, Lancashire
So at the weekend I had a bit of a tidy and got the rear of the TT up on axle stands in preparation for starting and running in 1st gear to check the gearbox oil level. I’ve still got a few more bits to do before this happens.
On Tuesday I picked up the intercooler crossover pipe after being powder coated and today I reinstalled the dogbone mount.
On Tuesday I picked up the intercooler crossover pipe after being powder coated and today I reinstalled the dogbone mount.
- Attachments
-
- IMG_1787.jpeg (500.39 KiB) Viewed 2155 times
-
- IMG_1802.jpeg (642.37 KiB) Viewed 2155 times
-
- IMG_1804.jpeg (404.37 KiB) Viewed 2155 times
Mk1 TT225 Coupe 2002
-
AK47
- Posts: 98
- Joined: Wed May 08, 2019 11:47 am
- TTOC Membership: 03817
- Location: Isleham, East Cambs
Good on you Brian, I bet you’re itching to get back in and have a drive, ‘cos I certainly am desperate to hear how it feels. Very impressed with your attention to details, I appreciate you taking the time to photo your progress, thanks. All the best to getting all completed.
[img][img]
03817
2002 Silver TT Quattro Roadster with Revo Stage 1
03817
2002 Silver TT Quattro Roadster with Revo Stage 1
-
BrianB
- Posts: 577
- Joined: Wed Dec 16, 2015 7:21 pm
- TTOC Membership: 02935
- Location: Preston, Lancashire
Thank you, it’s taken longer than I expected but then given that I work away from home on a week on/off basis time actually spent taking everything apart and then putting it all back together again probably isn’t that long really. Plus pretty much everything I have removed has been cleaned and corrosion removed and repainted.AK47 wrote: ↑Thu Feb 01, 2024 7:33 pm Good on you Brian, I bet you’re itching to get back in and have a drive, ‘cos I certainly am desperate to hear how it feels. Very impressed with your attention to details, I appreciate you taking the time to photo your progress, thanks. All the best to getting all completed.
Some things I have noticed I will just have to live with for now otherwise it will never get on the road.
A few more jobs done, intercooler crossover pipe reinstalled, although not used as I have a front mount intercooler fitted but does form a brace between the two chassis rails at the front.
In addition I have decided to install the air filter heat shield that I got from DC240 some time back which has meant some adjustment and trimming of the turbo inlet pipe.
- Attachments
-
- IMG_1808.jpeg (401.69 KiB) Viewed 1322 times
-
- IMG_1799.jpeg (489.02 KiB) Viewed 1322 times
-
- IMG_1814.jpeg (520.11 KiB) Viewed 1322 times
Mk1 TT225 Coupe 2002
-
BrianB
- Posts: 577
- Joined: Wed Dec 16, 2015 7:21 pm
- TTOC Membership: 02935
- Location: Preston, Lancashire
More progress made and completion is getting very close. The battery has been reinstalled and the TT started for the first time in 7 months, ran for approximately 15 mins in 1st gear and leak checks carried out and oil levels checked, so far so good. The real test will be when I take it out on the road.
Still need to make some final adjustments to the heat shield and air filter and replace the supplied clamps with some JCS Hi Grip clamps.
The slam panels, battery, coolant bottle covers and wheel arch liners have been cleaned and refitted and the engine side panels have also been cleaned prior to fitting and the corroded clip nuts replaced.
- Attachments
-
- IMG_1847.jpeg (381.82 KiB) Viewed 922 times
-
- IMG_1848.jpeg (644.13 KiB) Viewed 922 times
-
- IMG_1859.jpeg (640.97 KiB) Viewed 922 times
Mk1 TT225 Coupe 2002
-
BrianB
- Posts: 577
- Joined: Wed Dec 16, 2015 7:21 pm
- TTOC Membership: 02935
- Location: Preston, Lancashire
Air Filter clamps replaced and happy with the fitment, although may change the black silicon joiner between the maf and air filter for blue.
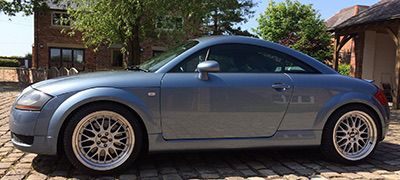
Finally sitting on all four wheels and just 7 months of dust and grime to clean off before taking it out and giving it one more check over for leaks etc. Also need to check the headlight alignment but hopefully after that it will all be good.
Finally sitting on all four wheels and just 7 months of dust and grime to clean off before taking it out and giving it one more check over for leaks etc. Also need to check the headlight alignment but hopefully after that it will all be good.
- Attachments
-
- IMG_1873.jpeg (485.43 KiB) Viewed 816 times
Mk1 TT225 Coupe 2002
-
BrianB
- Posts: 577
- Joined: Wed Dec 16, 2015 7:21 pm
- TTOC Membership: 02935
- Location: Preston, Lancashire
Thank you, 7 months of sitting in the garage all cleaned off. First test drive on Saturday and huge boost leak under acceleration
Still need to do another leak check of the power steering pipes and drain and fill plugs etc and looking forward to seeing how the gearbox performs.
- Attachments
-
- IMG_1894.jpeg (540.82 KiB) Viewed 555 times
-
- IMG_1897.jpeg (433.41 KiB) Viewed 555 times
Mk1 TT225 Coupe 2002