
Hi Brian,
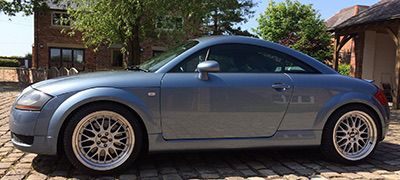
Everything looks amazing, great work, congrats. Love the rear wheel arch spats.
Kind regards,
BB's TT
Forum rules
Each TTOC Member can post one thread to contain a full journal of their TT ownership.
This can be a full blown build thread or as simple as a set of pictures, the choice is yours.
Each TTOC Member can post one thread to contain a full journal of their TT ownership.
This can be a full blown build thread or as simple as a set of pictures, the choice is yours.

-
BrianB
- Posts: 577
- Joined: Wed Dec 16, 2015 7:21 pm
- TTOC Membership: 02935
- Location: Preston, Lancashire
After a couple of coats of Eastwoods extreme chassis satin black I changed out My existing wiper arms and blades for the aero arms and blades.
I really should have done this when I first got my TT in 2015!!!
I really should have done this when I first got my TT in 2015!!!
- Attachments
-
- D07709EE-CE04-4673-B0C6-F367290E0506.jpeg (1.03 MiB) Viewed 11308 times
-
- 613067D4-CDC8-43B0-913E-E48A1DFCA8D9.jpeg (903.06 KiB) Viewed 11308 times
-
- C9ACBD99-C988-4342-9231-A82ED9BF8FB0.jpeg (761.31 KiB) Viewed 11308 times
Mk1 TT225 Coupe 2002
-
BrianB
- Posts: 577
- Joined: Wed Dec 16, 2015 7:21 pm
- TTOC Membership: 02935
- Location: Preston, Lancashire
Also gave it the clay bar treatment and finished off with some Bilt Hamber speed wax, again something else I should have done sometime ago 
- Attachments
-
- D9604703-325D-4347-9D95-5162B34CB8FE.jpeg (992.22 KiB) Viewed 11308 times
-
- 37B815F3-46BD-4E90-9507-27D3B0FFCDB3.jpeg (957.94 KiB) Viewed 11308 times
Mk1 TT225 Coupe 2002
-
BrianB
- Posts: 577
- Joined: Wed Dec 16, 2015 7:21 pm
- TTOC Membership: 02935
- Location: Preston, Lancashire
The last couple of weeks I decided to tackle some small areas of corrosion under the rear wheel arch liners.
These were rubbed down and treated with Bilt Hamber Hydrate 80, then coated with some upol flexible seam sealer, primed and then base coat and clearcoat.
The following are a selection of photos taken during the process, starting with the areas of corrosion.
These were rubbed down and treated with Bilt Hamber Hydrate 80, then coated with some upol flexible seam sealer, primed and then base coat and clearcoat.
The following are a selection of photos taken during the process, starting with the areas of corrosion.
- Attachments
-
- 62B60A2E-7F51-4856-9F6F-4F26F57683EE.jpeg (1.16 MiB) Viewed 11186 times
-
- F821E441-CE0A-47A6-9836-25E082C85DB6.jpeg (1.14 MiB) Viewed 11186 times
Mk1 TT225 Coupe 2002
-
BrianB
- Posts: 577
- Joined: Wed Dec 16, 2015 7:21 pm
- TTOC Membership: 02935
- Location: Preston, Lancashire
After the Hydrate 80 treatment and seam sealer application.
- Attachments
-
- FE7D2EDF-9D6B-49BA-8F01-714EFEEE977F.jpeg (1.08 MiB) Viewed 11186 times
-
- 78F28DE0-8C96-4108-8E7E-51451766F00B.jpeg (1.07 MiB) Viewed 11186 times
Mk1 TT225 Coupe 2002
-
BrianB
- Posts: 577
- Joined: Wed Dec 16, 2015 7:21 pm
- TTOC Membership: 02935
- Location: Preston, Lancashire
Wheel Arch liners refitted after a clean with Bilt Hamber surfex hd and then treated with Autoglym vinyl and rubber care, attachment screws taken back to bare metal and then primed with BH electrox and top coat of Eastwoods extreme chassis satin black, not too bad for 19 years old.
- Attachments
-
- 6FC5E142-11F3-42BA-AD9E-CC9DACFAE2F0.jpeg (758.06 KiB) Viewed 11129 times
-
- 510C4F62-0827-4F00-9249-4EBA8BD2AA70.jpeg (836.4 KiB) Viewed 11129 times
Mk1 TT225 Coupe 2002
-
BrianB
- Posts: 577
- Joined: Wed Dec 16, 2015 7:21 pm
- TTOC Membership: 02935
- Location: Preston, Lancashire
So it’s almost a year ago that I picked up a used front subframe from a Mk1 TT breakers in Blackburn. This subframe I left with a company in Preston who stripped the paint off it carried our a chemical corrosion removal process and then powder coated it for me..
After 10 months I finally got round to removing my original subframe and installing this refurbished one. In addition to the subframe I also replaced the forward coupling rods ( drop links ) and cleaned up the dog bone mount and gave it a fresh coat of paint.
- CAD8EE80-783A-42A7-AB3B-760EF6BCEFD4.jpeg (677.21 KiB) Viewed 10960 times
- 1DCC6EDF-CF89-4708-A788-FB1202D74CB3.jpeg (752.83 KiB) Viewed 10960 times
- DA5AA612-2455-412C-924B-F2EBD7C7CE57.jpeg (1.01 MiB) Viewed 10960 times
Mk1 TT225 Coupe 2002
-
BrianB
- Posts: 577
- Joined: Wed Dec 16, 2015 7:21 pm
- TTOC Membership: 02935
- Location: Preston, Lancashire
I also cleaned up the small forward level sensor linkage while it was off.
- Attachments
-
- FA70D39A-61EE-4F0E-89BB-D90FDF52E321.jpeg (685 KiB) Viewed 10959 times
-
- 24E6F37D-A9D4-42E5-97BC-BB4159FC7BDA.jpeg (831.2 KiB) Viewed 10959 times
Mk1 TT225 Coupe 2002