The replacement of the rear upper and lower control arms highlighted the poor condition of the driveshafts. Over the last few days I’ve tackled the surface corrosion and although it’s not completely removed it’s looking a lot better now.
The driveshafts were wire brushed and then sanded with 240 wet and dry paper, degreased and treated with Bilt Hamber Hydrate 80 and then a top coat of Eastwoods Extreme Chassis Black.
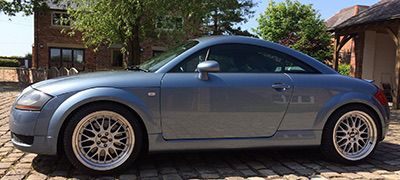
BB's TT
Forum rules
Each TTOC Member can post one thread to contain a full journal of their TT ownership.
This can be a full blown build thread or as simple as a set of pictures, the choice is yours.
Each TTOC Member can post one thread to contain a full journal of their TT ownership.
This can be a full blown build thread or as simple as a set of pictures, the choice is yours.
-
BrianB
- Posts: 577
- Joined: Wed Dec 16, 2015 7:21 pm
- TTOC Membership: 02935
- Location: Preston, Lancashire
After the Hydrate 80 and Chassis Black treatment.
- Attachments
-
- 331D2E72-843A-4F54-A1A8-3B26CCB95C56.jpeg (946.08 KiB) Viewed 10098 times
-
- FE871DC5-5215-4806-82E9-280F78EBDA22.jpeg (974 KiB) Viewed 10098 times
Mk1 TT225 Coupe 2002
Brian, curious about the plastic sheet and zip tie (colour coordinated no less) solution on your lower control arms - does the rubber boot create challenges? Just waiting for the weather to warm/dry up a little and then I can finally spray paint your old ones and get them fitted).
-
BrianB
- Posts: 577
- Joined: Wed Dec 16, 2015 7:21 pm
- TTOC Membership: 02935
- Location: Preston, Lancashire
Hi, I moved the rubber boot and put the plastic and zip ties on when I went to have the alignment done, once the adjustment had been carried out I took a measurement of the new position and put the plastic and zip ties on so I could check they hadn’t changed after a few miles of driving.BadgerTT wrote: ↑Sun May 09, 2021 1:32 pm Brian, curious about the plastic sheet and zip tie (colour coordinated no less) solution on your lower control arms - does the rubber boot create challenges? Just waiting for the weather to warm/dry up a little and then I can finally spray paint your old ones and get them fitted).
Just haven’t got round to taking it off and moving the boot back over the adjuster.
Mk1 TT225 Coupe 2002
-
BrianB
- Posts: 577
- Joined: Wed Dec 16, 2015 7:21 pm
- TTOC Membership: 02935
- Location: Preston, Lancashire
Little bit of cleaning carried out inside over the last few days plus the replacement of the upper and lower steering wheel trim pieces that were in poor condition especially around the ignition switch area. In order to replace these two trim items required the removal of the drivers airbag and steering wheel.
A solution of Bilt Hamber surfex HD was used to clean the marks of the passenger footwell trim.
- Before
- 0534A12D-99CB-4EF2-B3C6-B2B125A75FF5.jpeg (1 MiB) Viewed 9299 times
- After
- 75C386F8-EE53-4965-A2C4-909F6E1523AF.jpeg (990.4 KiB) Viewed 9299 times
Mk1 TT225 Coupe 2002
-
BrianB
- Posts: 577
- Joined: Wed Dec 16, 2015 7:21 pm
- TTOC Membership: 02935
- Location: Preston, Lancashire
Old steering wheel trim.
- Attachments
-
- A07D8AA0-22F1-41B0-B13D-7CAC46A981A1.jpeg (940.49 KiB) Viewed 9299 times
-
- 11E0FD39-4A60-4708-825F-9EA06BD40DA8.jpeg (616.19 KiB) Viewed 9299 times
Mk1 TT225 Coupe 2002
-
BrianB
- Posts: 577
- Joined: Wed Dec 16, 2015 7:21 pm
- TTOC Membership: 02935
- Location: Preston, Lancashire
New steering wheel trim.
- FBB185D8-B2FB-454D-A87D-8C7D02D73A42.jpeg (1.07 MiB) Viewed 9299 times
- 98F79306-E158-4790-8D23-F50174BA9F00.jpeg (675.93 KiB) Viewed 9299 times
- 9D6FB474-4203-4ACA-A26A-A556FE187437.jpeg (797.62 KiB) Viewed 9299 times
Mk1 TT225 Coupe 2002
-
BrianB
- Posts: 577
- Joined: Wed Dec 16, 2015 7:21 pm
- TTOC Membership: 02935
- Location: Preston, Lancashire
All installed and looking a lot fresher.
- Attachments
-
- 07D3BCBE-5A79-4A76-908C-29320ED2A4EC.jpeg (791.54 KiB) Viewed 9299 times
-
- CF217663-1F86-4F09-B8BE-410A81079E60.jpeg (766.49 KiB) Viewed 9299 times
-
- 9FF6CE80-44F3-4715-8654-9E9022714AC8.jpeg (879.79 KiB) Viewed 9299 times
Mk1 TT225 Coupe 2002
-
BrianB
- Posts: 577
- Joined: Wed Dec 16, 2015 7:21 pm
- TTOC Membership: 02935
- Location: Preston, Lancashire
Having lived with the bubbling paintwork around the rear number plate lights on the tailgate since acquiring my TT back in 2015, I finally decided to have a go at cleaning it up. My main concern was getting a reasonable colour match from an aerosol can.
The two lights and plastic strip between them were removed for access.
The two lights and plastic strip between them were removed for access.
- Attachments
-
- CF232215-661D-4EB1-98B5-D26C71C42DC9.jpeg (926 KiB) Viewed 8922 times
-
- AB3B9004-234F-4F57-9996-48538DA81067.jpeg (1.01 MiB) Viewed 8922 times
-
- 0095E4E7-E41C-49F9-A749-57BFCBC1D3E9.jpeg (614.66 KiB) Viewed 8922 times
Mk1 TT225 Coupe 2002
-
BrianB
- Posts: 577
- Joined: Wed Dec 16, 2015 7:21 pm
- TTOC Membership: 02935
- Location: Preston, Lancashire
Following removal of the corrosion Bilt Hamber Electrox Zinc Primer was applied.
- Attachments
-
- A47807E6-E150-4F3D-BA0D-190122EAA819.jpeg (742.5 KiB) Viewed 8922 times
-
- 23A9EF3B-629A-4957-A266-969FA95FA006.jpeg (920.05 KiB) Viewed 8922 times
-
- 1FC3D8AB-A211-4758-844F-FF29E2E97450.jpeg (770.58 KiB) Viewed 8922 times
Mk1 TT225 Coupe 2002